
Text rendering is cursed. Anyone who has worked on text will tell you the
same; whether it’s about layout, bi-directional, shaping, Unicode, or the
rendering itself, it’s never a completely solved problem. In my personal case,
I’ve been working on trying to render text in the context of a compositing
engine for creative content. I needed crazy text effects, and I needed them to
be reasonably fast, which implied working with the GPU as much as possible. The
distance field was an obvious requirement because it unlocks anti-aliasing and
the ability to make many great effects for basically free.
In this article, we will see how to compute signed distance field on the GPU
because it’s much faster than doing it on the CPU, especially when targeting
mobile devices. We will make the algorithm decently fast, then after lamenting
about the limitations, we will see what kind of effects this opens up.
Extraction of glyph outlines
Non-bitmap fonts contain glyphs defined by outlines made of closed sequences
of lines and (quadratic or cubic) Bézier curves. Extracting them isn’t exactly
complicated: FreeType or ttf-parser typically expose a way to do that.
For the purpose of this article, we’re going to hard code the list of the Bézier
curves inside the shader, but of course in a more serious setup those would be
uploaded through storage buffers or similar.
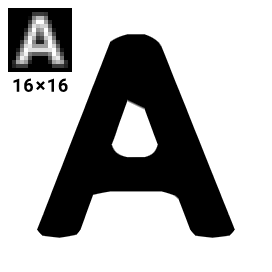
Using this tiny program, a glyph can be dumped as series of
outlines into a fixed size array:
struct Bezier {
    vec2 p0; // start point
    vec2 p1; // control point 1
    vec2 p2; // control point 2
    vec2 p3; // end point
};

#define N 42
#define NC 2
const int glyph_A_count[2] = int[](33, 9);
const Bezier glyph_A[42] = Bezier[](
    Bezier(vec2(  0.365370,  -0.570817), vec2(  0.374708,  -0.631518), vec2(  0.332685,  -0.687549), vec2(  0.339689,  -0.748249)),
    Bezier(vec2(  0.339689,  -0.748249), vec2(  0.339689,  -0.748249), vec2(  0.344358,  -0.764591), vec2(  0.351362,  -0.771595)),
    Bezier(vec2(  0.351362,  -0.771595), vec2(  0.384047,  -0.822957), vec2(  0.402724,  -0.855642), vec2(  0.442412,  -0.885992)),
    // ...
);
glyph_A_count contains how many Bézier curves there is for each sub-shape
composing the glyph, and glyph_A contains that list of Bézier cubic curves.
Even though glyphs are also composed of lines and quadratic curves, we expand
them all into cubics: “who can do more can do less”.
We use these formulas to respectively expand lines and quadratics into cubics:
\begin{aligned}
B_1 &= \begin{bmatrix}
P_0 \\
\mathrm{mix}(P_0, P_1, 1/3) \\
\mathrm{mix}(P_0, P_1, 2/3) \\
P_1
\end{bmatrix} \\
B_2 &= \begin{bmatrix}
P_0 \\
\mathrm{mix}(P_0, P_1, 2/3) \\
\mathrm{mix}(P_1, P_2, 1/3) \\
P_2
\end{bmatrix}
\end{aligned}
Where P_n are the Bézier control points.
For simplicity and because we want to make sure the most complex case is well
tested, we will stick to this approach in this article. But it also means there
is a lot of room for further optimizations. Since solving linear and quadratics
is much simpler, this is left as an exercise for the reader.
Warning
You may be tempted to upload the polynomial form of these curves directly to
save some computation in the shader. Don’t. You will lose the exact
stitching property because one evaluated polynomial end B_n(1) will
not necessary match the next polynomial start B_{n+1}(0). This makes
artificial “precision holes” that will break rendering in obscure ways.
Signed distance to the shape
In the previous article, we saw how to get the distance to
a cubic Bézier curve. Each glyph being composed of multiple outlines, we can
simply run over all of them and pick the shortest distance.
float get_distance(vec2 p, Bezier buf[N], int counts[NC]) {
    int base = 0;
    float dist = 1e38;

    for (int j = 0; j < NC; j++) {
        int count = counts[j];

        for (int i = 0; i < count; i++) {
            Bezier b = buf[base + i];
            float d = bezier_sq(p, b.p0, b.p1, b.p2, b.p3);
            dist = min(dist, d);
        }

        base += count;
    }

    return sqrt(dist);
}
Where bezier_sq() is the distance to the Bézier curve, squared, as defined in
the previous article.
This works just fine, but as you can imagine, it’s not cheap to solve so many
distances per pixel. A first straightforward optimization would be to ignore any
curve with a bounding box further than our currently best distance, because none
of them can give a shorter one:
Where each box encloses a Bézier curve like this:
We could use a tighter bound but it would require more computation so this felt
like a good trade-off.
Implementing this in the inner loop is pretty simple:
for (int i = 0; i < count; i++) {
    Bezier b = buf[base + i];
    vec2 p0=b.p0, p1=b.p1, p2=b.p2, p3=b.p3;

    // Distance to box (0 if inside), squared
    vec2 q0 = min(p0, min(p1, min(p2, p3)));
    vec2 q1 = max(p0, max(p1, max(p2, p3)));
    vec2 v = max(abs(q0+q1-p-p)-q1+q0, 0.)*.5;
    float h = dot(v,v);

    // We can't get a shorter distance than h if we were to compute the
    // distance to that curve
    if (h > dist)
        continue;

    float d = bezier_sq(p, p0, p1, p2, p3);
    dist = min(dist, d);
}
The distance to the bounding box formula comes from this explicative video by
Inigo Quilez (the basic one, without the inside distance), adapted to
the Bézier control point coordinates.
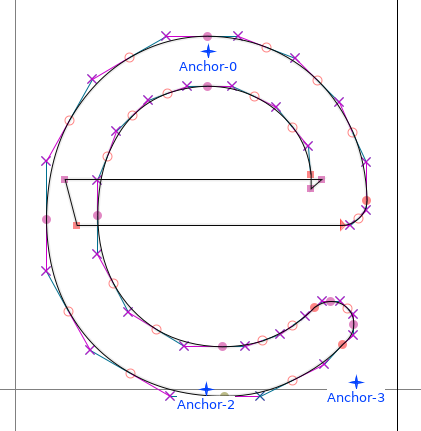
This saves a lot of computation in certain cases, but the worst case is still
pretty terrible, as shown by the heat map of this ‘C’ glyph:
Indeed sometimes, it takes a long time to reach a good Bézier curve that is
small enough to disregard most of the others. We observe it the further we go
away from the beginning of the shape.
So the next step is to find a good initial candidate. One cheap way to do that
is to first compute the distance to the center point of each curve, and pick
the smallest:
// Find a good initial guess
int best = 0;
float boxd = 1e38;
for (int i = 0; i < count; i++) {
    Bezier b = buf[base + i];
    vec2 p0=b.p0, p1=b.p1, p2=b.p2, p3=b.p3;
    vec2 q0 = min(p0, min(p1, min(p2, p3)));
    vec2 q1 = max(p0, max(p1, max(p2, p3)));
    vec2 v = (q0+q1)*.5 - p;
    float h = dot(v,v);
    if (h < boxd)
        best=i, boxd=h;
}

// Initial guess
Bezier bb = buf[base + best];
dist = min(dist, bezier_sq(p, bb.p0, bb.p1, bb.p2, bb.p3));

for (int i = 0; i < count; i++) {
    if (i == best) // We already computed this one
        continue;

    Bezier b = buf[base + i];
    vec2 p0=b.p0, p1=b.p1, p2=b.p2, p3=b.p3;
    // ...
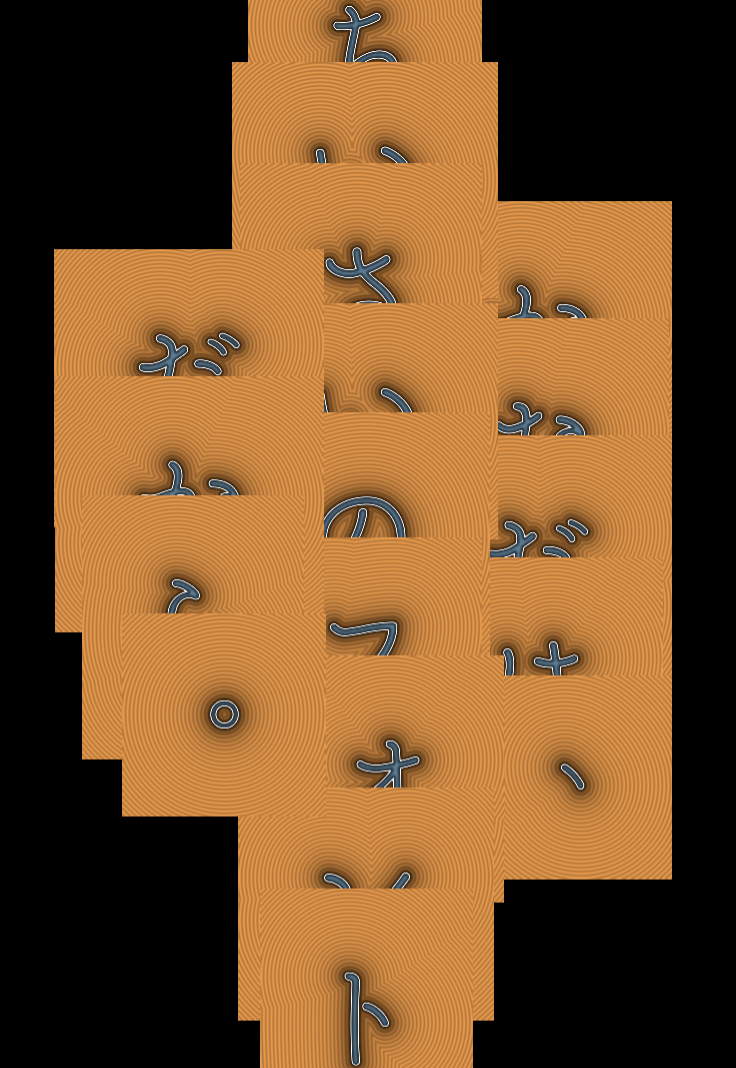
This optimization is immediately reflected on the heat map, where only the
central point seems to become a critical point (this glyph is a pathological
case as it forms a circle):
Winding number
The last step is to figure out whether we are inside or outside the shape. There
are two schools here, the even-odd and the non-zero rules. We’ll pick the
latter because that’s the expectation in the case of font rendering.
In deconstructing Bézier curves, we explained the theory of that
specific algorithm so we’re not going to dive into the details again. The basic
idea is to strike a ray in one direction from our current position, and get
how many times we cross a given curve. Here we will arbitrarily choose a
horizontal ray line y = P_y where P is our current coordinate.
The topology of each curve can hint us on whether it’s worth considering it or
not. For example, if every control point is above or below our current position,
it can be ignored. We can store all the signs in a mask and bail out as soon
as the ray is either completely below or completely above the bounding box of
the curve:
int signs = int(p0.y < p.y)
          | int(p1.y < p.y) << 1
          | int(p2.y < p.y) << 2
          | int(p3.y < p.y) << 3;
if (signs == 0 || signs == 15) // all signs are identical
    return 0;
Each sign indicates the position of the control point with regard to the ray.
We can use the relative position of the starting point as a reference for the
overall orientation (if there is a crossing, we know it will come from below
or above):
int inc = (signs & 1) == 0 ? 1 : -1;
We also need to convert the Bézier curves to the usual polynomial
at^3+bt^2+ct+d:
vec2 a = -p0 + 3.*(p1 - p2) + p3,
     b = 3. * (p0 - 2.*p1 + p2),
     c = 3. * (p1 - p0),
     d = p0 - p;
Then we can find the y-roots and check every point on the x-axis. For every
crossing point (at most 3), we switch the sign:
    float r[5];
    int count = root_find3(r, a.y, b.y, c.y, d.y);
    vec3 t = vec3(r[0], r[1], r[2]);
    vec3 v = ((a.x*t + b.x)*t + c.x)*t + d.x;
    if (count > 0 && v.x >= 0.) w += inc;
    if (count > 1 && v.y >= 0.) w -= inc;
    if (count > 2 && v.z >= 0.) w += inc;
Since we already have a 5th degree root finder from the previous article, we
just have to build a tiny version for the 3rd degree:
int root_find3(out float r[5], float a, float b, float c, float d) {
    float r2[5];
    int n = root_find2(r2, 3.*a, b+b, c);
    return cy_find5(r, r2, n, 0., 0., a, b, c, d);
}
Note
Our root finder doesn’t return roots outside [0,1] so no filtering is
required.
To summarize:
int bezier_winding(vec2 p, vec2 p0, vec2 p1, vec2 p2, vec2 p3) {
    int w = 0;
    int signs = int(p0.y < p.y)
              | int(p1.y < p.y) << 1
              | int(p2.y < p.y) << 2
              | int(p3.y < p.y) << 3;
    if (signs == 0 || signs == 15)
        return 0;
    int inc = (signs & 1) == 0 ? 1 : -1;
    vec2 a = -p0 + 3.*(p1 - p2) + p3,
         b = 3. * (p0 - 2.*p1 + p2),
         c = 3. * (p1 - p0),
         d = p0 - p;
    float r[5];
    int count = root_find3(r, a.y, b.y, c.y, d.y);
    vec3 t = vec3(r[0], r[1], r[2]);
    vec3 v = ((a.x*t + b.x)*t + c.x)*t + d.x;
    if (count > 0 && v.x >= 0.) w += inc;
    if (count > 1 && v.y >= 0.) w -= inc;
    if (count > 2 && v.z >= 0.) w += inc;
    return w;
}
For every sub-shape, we can accumulate the winding number, and use it at the end
to decide whether we’re inside or outside:
float get_distance(vec2 p, Bezier buf[N], int counts[NC]) {
    int w = 0;
    int base = 0;
    float dist = 1e38;

    for (int j = 0; j < NC; j++) {
        int count = counts[j];

        // Get the sign of the distance
        for (int i = 0; i < count; i++) {
            Bezier b = buf[base + i];
            w += bezier_winding(p, b.p0, b.p1, b.p2, b.p3);
        }

        // ...
    }

    // Positive outside, negative inside
    return (w != 0 ? -1. : 1.) * sqrt(dist);
}
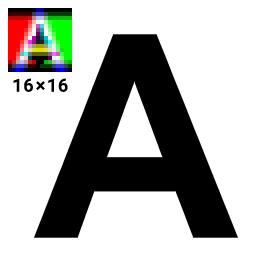
And voilà:
Warning
This winding number logic might be too fragile: it doesn’t cover potential
degenerate cases such as horizontal tangents / duplicated roots. But for
some reason, while I fought these issues for years, none of the weird corner
cases seemed to glitch in my extensive tests, probably because the root
finder is more resilient than what I was using before.
Limitations
Wicked curves
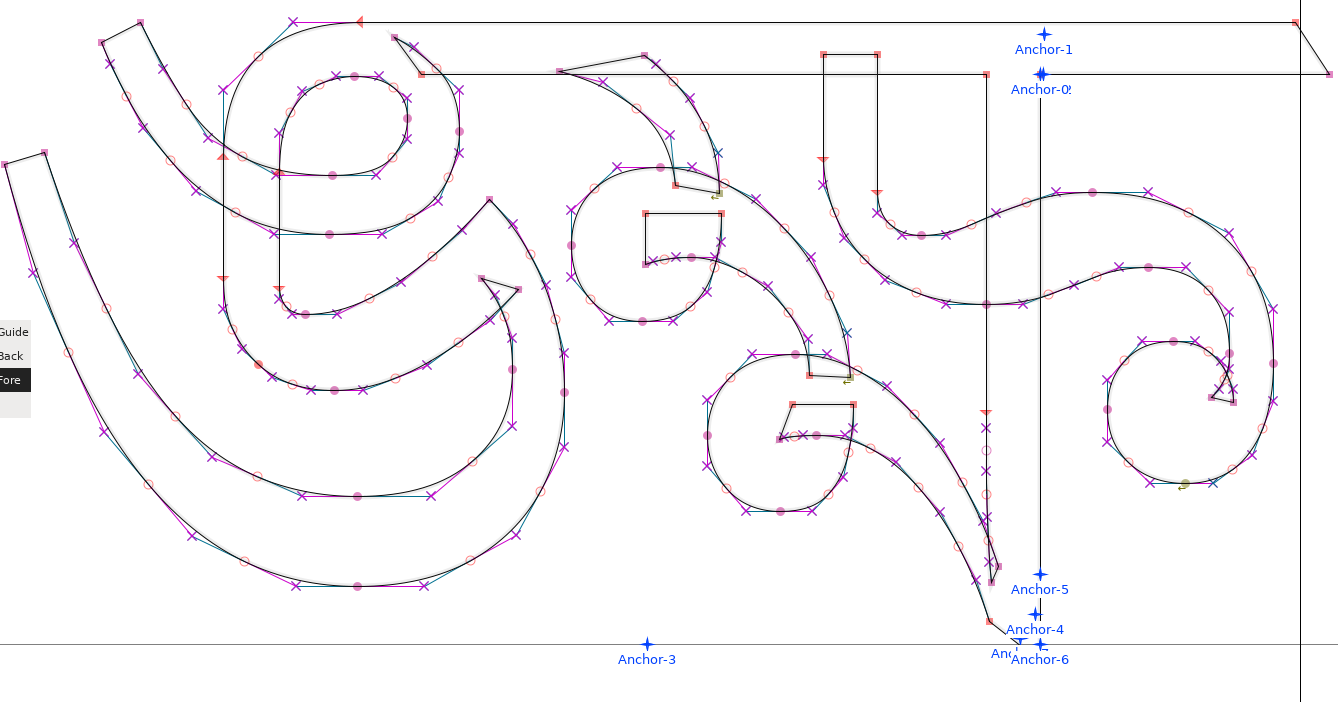
This may look satisfying, but it’s only the beginning of the problems. For
example, variadic fonts are typically following chaotic patterns:
In addition to the self overlapping part, notice the reverse folding triangle on
the right.
This completely wreck the distance field:
Even with a simple character display (meaning something that doesn’t exploit the
wide range of effects available with an SDF), it starts to glitch:
Little “cracks” should appears around the overlaps. This can be mitigated by
lowering the distance by a tiny constant to avoid the zero-crossing, but it
impacts the overall glyph (it gets more bold).
And it’s not just because of variadic problem, sometimes designers rely on
overlaps for simplicity:
And sometimes… well let’s say they have a legitimate reason to do it:
This is not something that can be addressed easily.
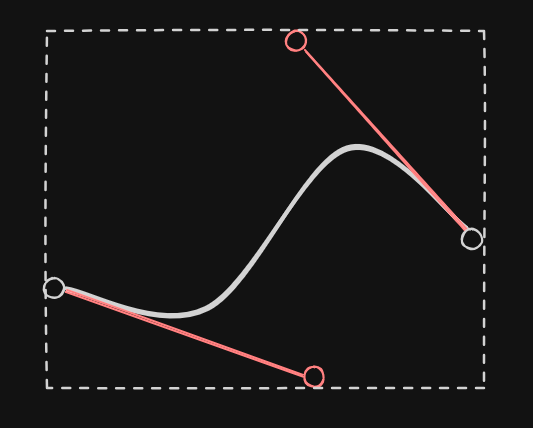
For example, take these two overlapping shapes:
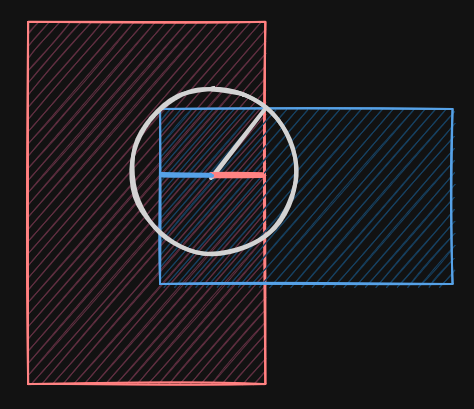
We see that the actual distance (white circle) is not the smallest distance
to either shape, and it’s not even the smallest distance to any edge: it is at
an intersection point between two curves, which we do not have. Here we’re
dealing with line segments, but with cubic curves, the problem explodes in
complexity.
At this point, we need another strategy, like feeding the GPU renderer with
preprocessed outline-only curves. Many people rely on curves flattening to
address this issue. This is unfortunately yet another field of research that
we’re not going to explore this time.
Inigo talked about the combination of signed distance if you want
some ideas, but aside from the first one (giving up), none seems particularly
applicable here.
Atlas and overlapping distances
Some effects such as blur or glow expand beyond the boundaries of the
characters, so the distance field needs to be larger than the glyph itself. This
means when an effect spread too large, there will be an overlap. If we’re making
an effect on a word, the distance field must be the unified version of all the
word glyphs (or sometimes even the sentence). The classic approach of an atlas
of glyph distances will not work reliably.
In the following illustration, a geometry per glyph is used, each geometry is
enlarged to account for the larger distance field, and we end up with potential
overlaps when applying effects.
Rounded corners
Like all distance maps, it suffers from the same limitations. The most common
one is the rounded corners problem. This is typically addressed using a
multi-channel signed distance field generator, but it’s hard for me
to tell how accessible it is for a portage on the GPU.
Note
This problem only appears with intermediate textures. When computing exact
distances like here directly in the shaders, this is not an issue.
Effects
Despite all these limitations, we can already do so much, so let’s close this
article on a positive note. This is not done here, but all of these effects are
free as soon as we have the distance field stored in an intermediate texture.
First, we have anti-aliasing / blur:
I wrote a dedicated article on the subject of AA (and blur) on SDF if you
want more information on how to achieve that.
The shape can also be drastically altered with a simple operator such as
“rounding”:
d -= rounding;
This is the same technique we suggested to cover up for the overlap glitch
earlier, just rebranded as an effect.
In the same spirit we can also create an outline stroke (on the outer edge to
preserve the original glyph design):
This is sooo useful because it makes it possible for our text to be visible no
matter what the background is. So many editors don’t have this feature because
it’s hard and expensive to do correctly. Given a distance field though, all we
have to do is this (which also includes anti-aliasing on every border):
float aa = fwidth(d); // pixel width estimates
float w = aa * .5; // half diffuse width
vec2 b = vec2(0,1)*outline - d; // inner and outer boundaries; vec2(-1,0) for inner, vec2(-.5,.5) for centered
float inner_mask = smoothstep(-w, w, b.x); // cut-off between the outline and the outside (whole shape w/ outline)
float outer_mask = smoothstep(-w, w, b.y); // cut-off between the fill color and the outline (whole shape w/o outline)
float outline_mask = outer_mask - inner_mask;
vec3 o = (inner_color*inner_mask + outline_color*outline_mask) * outer_mask;
We can also dig into our character with d = abs(d)-ring:
And maybe apply some glow to create a neon effect:
float glow_power = glow * exp(-max(d, 0.) * 10.);
o += glow_color * glow_power;
We could also do drop shadows, all sorts of distortions, or so many other
creative way exploiting this distance. You get the idea: it is fundamental as
soon as you want fast visual effects.
Conclusion
This article is the last of the series on 2D rendering for me. I’ve wanted
to share this experience and knowledge after many years of struggling (mostly
alone) on these issues. I wish I could have succeeded in providing a good free
and open-source text effects rendering engine to compete with the industry
standards. (Un)fortunately for me, the adventure stops here, but I hope this
will benefit creators and future tinkerers interested in the subject.
For updates and more frequent content you can follow me on
Mastodon. Feel also free to subscribe to the
RSS in order to be notified of new write-ups. It is also usually
possible to reach me through other means (check the footer below). Finally,
discussions on some of the articles can sometimes be found on HackerNews,
Lobste.rs and Reddit.